Baby Boy Thank Yous, part 4

Here it is – the final post in my short series of Baby Boy Thank You cards! (You can start here to see the others.) I said this at the beginning, but it bears repeating: Most of these cards could easily be adapted. A different color scheme, a different sentiment, and they’d be perfect for other occasions.

When I started making these, I wanted fairly simple, quick cards. After all, I had quite a few to make! I liked some, and didn’t love some, but these three are my favorites. I made several of each, and I will use these designs in the future for other things, though with a few changes and tweaks here and there.

#3.

I love blue and brown together. My Beloved says that combination, in just about any shades, is “girly,” and won’t let me have those colors in our bedroom, so I live vicariously through my crafting.  I wasn’t sure how well the combination of a hand print stamp and this sentiment would work out. I’d already cut out the oval with my Silhouette, and I don’t have a stamp positioner, so it was a lot of guessing and hoping. I like the double ribbon a lot! The top patterned ribbon adds some interest, but it was too thin and weak looking on its own. I like the amount of white space on this one, too. Nice and clean!

#2.

Not really a boy card, is it? But that’s okay. I didn’t intend for all of the cards to feel masculine. This one is a nice, basic thank you that works well for a female recipient. I love the blue background. It has a subtle, white swirl stitching pattern on it. Interesting without being too busy. The sentiment really stands out due to the darker color and white mat behind it, and the ribbon is the perfect embellishment to finish things off!
And here it is, my favorite card out of the dozen I’ve shown  you in this series…

#1.

What can I say? I love this card. Really, really love it. The shapes and sentiment are all so super simple. Just squares and rectangles. The interest all comes from the layering and the patterns. I like the weathered, distressed look on the edge of the sentiment. I just pressed it against a stamp pad that was starting to run out of ink. I inked all of the edges of the rectangles, which takes a bit of time, but it’s easy and the effect is absolutely worth it. Without that, this card would be flat and lifeless. I think this might become a go-to sketch for me. It would be so lovely in almost any pattern collection, and I can do it all with just a cutter, one stamp, and one ink pad. That’s pretty hard to beat!
Which is your favorite? How long did it take you to get thank you cards out after a baby? I’m ashamed to admit how long it takes me. Every time, I have sworn it would be better, and every time it has not been. Granted, we’ve had an unrelated major crisis after each baby, but that’s really no excuse. Maybe next time, if there is one, I’ll finally get it done in a timely manner!


Baby Boy Thank Yous, part 3

A few more of the Baby Boy Thank you cards that I made after Monkey was born. You can find the previous posts starting here.

I wanted to make a variety of styles. It’s always fun to try things out, though I might try to streamline things and make several of just a few cards the next time that I need to make a bunch in a short amount of time.


I love this fun argyle print, the bit of shine on the tag, and the little seed bead accents, but I think that the inking of edges makes the biggest difference in this card.


Very simple. Very clean. I am a sucker for a onesie and a tie!


This dot paper was one of my favorite prints from this project, so I enjoyed showcasing it here. I also like the repetition of the square elements, and the two-tone inked edges of the sentiment square.


In my next post, I’ll share my 3 favorites of the baby boy thank you cards that I made! It was hard to pick. I don’t love every card that I made, but there are at least 2 that narrowly missed the cutoff. I hope you’re enjoying these and have been inspired. Please share with me your thoughts on these! I want to grow as a crafter, and I’d love to know your opinions and ideas!


COMPLETELY BESIDE THE POINT: I said once that I’d keep track of all of the words and phrases that this blog spell check does not recognize. I haven’t always done that, but here are today’s: crafter, onesie.


Baby Boy Thank Yous, part 2

I think I’ll have 4 posts in this series. I made duplicates of several of these cards, depending on what supplies I had on hand. It was fun to match up each card with a recipient!

I designed this one on my Silhouette, then tried several different combinations. I like it, but I don’t love it. This is another one that I’d like to revisit and change up a bit. I have definite preferences for some color and pattern combinations than others. I was working with a limited stash, and felt like I needed to use as much as I could, even if I wasn’t thrilled with the results. These are posted from my least favorite to my favorite of this set.

Baby Boy Thank yous

The first of a few posts with some thank you cards that I made for gifts, meals, etc. after Monkey was born.  I like some more than others. Which one is your favorite?

Proof that I need a stamp positioner. I’ve seen some DIY versions that I think I might try.

This one almost made it into the top 3.  I just like it. The design is simple and understated, but the patterned paper makes it fun and eye-catching.

I loved the embossing of the foot stamps. It really emphasized the fine lines and little imperfections that make them seem real. The embossing on the sentiment is less than stellar. I should have redone it. Leaving a smidge of border around the edge would have been an improvement. This one just begs for dimensional adhesive!

I’d love to hear your thoughts about which ones you like best, or what could be done to improve them. I know that dimensional adhesives would work to really add layers and interest to several of them. I just bought some, and I’m sure they will be a new addiction in papercrafting! I also think that the paper choices in several of them could be better. I bought a bunch of single sheets, and a collection would likely have worked better. There are some lovely boy themes out there!

Sweet Baby Girl Card

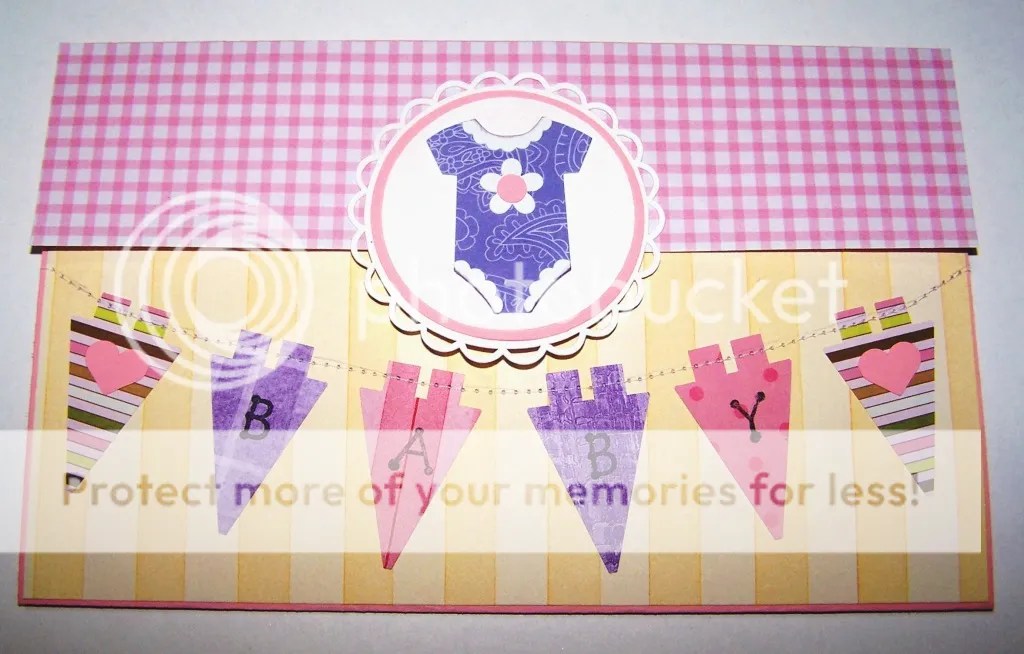
I was so very proud of this one when I made it. I designed some of these shapes myself – the onesie, the little lace edging on the neckline and sleeves, and the delicate scalloped circle. It’s hard to see in the picture, but this is a tri-fold. The yellow portion is a bottom flap, and the pink gingham folds down over it. The circle embellishment overlaps to help keep it closed. It’s a great design if you want to make a nice, long note inside. If not, it can leave a lot of empty space, so consider carefully how wordy you are feeling, or how big your handwriting is!

I like the colors on this one. Pink has grown on me a lot since having my first baby girl almost 6 years ago, but it’s still not my favorite color. I like it quite well in certain combinations, especially bolder, slightly funky colors. I think it’s fun and it adds a little punch to what can otherwise be a little too sweet for my usual tastes. (I want to say that it would be a bit ‘twee,’ because this is my newest favorite British word that I wish we used in the US! Chuffed is another.) If I ever put those little hearts on the banner again, they will be in a color with more contrast to the background, or I’ll ink the edges. They annoy me without that touch. I think some dimensional adhesive would really give this card some life and take away the very flat feeling. So, even though I like this one, I see lots of potential for improvement!

I should make a list of all of the cards that I want to do again, but better. That could keep me busy for a while, but I think I’d enjoy seeing how my style and techniques have progressed. What do you think? Make it a mini-series in the future?

Personalized Banner Welcome Card

This was one of my first Silhouette projects over a year ago, made for a cousin’s first baby. It’s still a favorite, and I should probably go back to this style more.

I should use sewing more. I am almost never sorry when I do. It’s such a nice detail, but I tend to have either papercrafts or sewing stuff accessible, not both. One of the reasons that I love my Silhouette is that I can get such a detailed, personalized, downright neat look without using a lot of different papers. I tend to favor solids and subtle patterns along with a clean and simple look. This isn’t the only way to achieve that, but it’s one of my favorites. If I had a dedicated crafting space, I would do a lot of other techniques. But I love being able to use nothing but paper, glue, and my machine when crafting space or time are tight.

Big, Bold Happy Birthday

I made this card for another friend in my birthday card swap. I need to figure out what this blue paper is, because I absolutely love it! It has a rich color and an incredible shimmer and shine. It’s almost glittery, but not quite. I can’t really get it to come across in photos, but it is gorgeous! I usually use it in small doses. It glams up a card really nicely, but I decided to try an over-the-top approach this time.

I designed and cut the navy blue bit with my Silhouette SD. It’s all one piece. I cut (with my Silhouette again) some pieces of cardstock to back the open bits of candle. I used Mod Podge to stick loads of red and gold glitter to those pieces. After they dried, I added a nice layer of mod Podge on top to really stick it down and coat it. I didn’t want the recipient cursing me later. Tiny bits of glitter seem to appear everywhere in my house, but I realize that may not be true for any house that doesn’t have 3- and 5-year-old girls regularly doing craft projects. When that layer was still sticky, I put the pieces in place. After it dried, I added the lighter blue backing. Here’s another attempt to show the beauty of this paper. The colors are truer here as well.

 
I was pleased with this one. It’s simple, but the bold graphic and shimmery textures make it special. I think I’ll probably revisit this idea in the future.
What do you think? What kinds of birthday cards are your favorites to receive?

Bright Birthday Card

I haven’t had much chance to blog for a few weeks. I blame it on the Olympics!  I have several photos of cards I’ve made, so I’m going to do a little series showcasing a few of those. If you have any questions, I’ll do my best to answer them, and maybe it will even lead to some tutorial posts or further inspiration.

Today’s card was made for a birthday card swap that I’m in. My Silhouette SD machine was packed away while I did some reorganizing, so I cut all the pieces by hand. I absolutely love the front of this card, and I’m definitely using this idea again. I just used one flower stamp and several different colors of Crayola markers instead of stamp pads. I used the same markers to color the stamp on the inset, and tried to get the colors close to the papers I used for the pop-up inside.

I wanted to do something fun for the inside, so I made a pop-up birthday cake. Originally, I had several different pop-ups making a dimensional pile of presents, but my brain stopped working around midnight this night, and I had a major mistake and had to start over. Thus, the birthday cake. I still like it, and I think the pennant on top pulls it together and keeps it from being too bare.

The inside is okay, but my main thought is “I can do better!” It’s an idea that I’ll revisit in the future. I know that the recipient enjoyed it, and that’s the most important thing!

Unfortunately, this is a card from before I started tracking my supplies, so I can’t tell you what papers I used or where to get them, but I think it would be quite easy to do something similar with whatever supplies you have or can get at your local craft shop.

My First Rag Quilt

This is for a sweet little boy born to a wonderful couple that we know in our other home in Kansas. These are the colors in his nursery, and they had me craving mint chocolate chip ice cream while I worked on it! I had so much fun deciding on the patterns on the front and back.

Front:

Back:

It still needs to be washed, and that should fluff up the seams nicely. I’ve been told to wash it in a heavy-duty commercial machine at a laundromat rather than my home machine, since the amount of strings and lint from all of the clipped seams will be extreme. It’s not easy to find time to hang out at a laundromat, so I haven’t finished that step yet. When I do, I’ll try to post a new pic before this project wings its way to Kansas. I’m so pleased with it. It should be a nice size either for a handy snuggle blanket or a play mat. I hope baby George enjoys it!

10 years ago

Having barely slept, I woke up early and double checked my bags. My best friends held up a sheet, so I could sneak behind it to my car without any risk of my fiance seeing me. (He was staying in the other half of the duplex, the side that would be ours.) We drove to the church. I curled my hair, applied my makeup, and pulled on hose and a garter. I carefully donned my white gown and shoes. I checked for my something borrowed (sapphire earrings), something blue (garter), something old (antique cameo pinned on my keepsake garter), something new (tiara), and made sure the sixpence was in my shoe. My bridesmaids, my Mom, and a few friends and family prayed with me. I pinned in my tiara and adjusted my veil. I picked up my bouquet, with my Mother’s bridal Bible as the base, and looked in the mirror. Then, on the arm of my Father, with a smile on my face and a gleam in my eye, I walked down the aisle

and married my Beloved!

I scanned in a bunch of our wedding photos today, and I’m going to stroll down memory lane. This blog is meant to focus on the lovely things in life, and marriage is way up on that list in my book! I realize there is a distinction between wedding and marriage, but consider this my way of celebrating both.

Before the ceremony. Isn’t he handsome? And so happy. Makes my heart smile. I don’t feel like I’ve changed all that much. (This isn’t to say that I look young – in college I regularly got cast as the mother of other students who are older than I am!) But this man…well, whether or not he’s grown up, his beard sure has!

We were just 20, in college and broke. We did most of the wedding ourselves and with help from family and friends. I made my own bouquet, did my own hair, makeup and nails. It may not be everyone’s cup of tea, but you can do a wedding on a small budget. Looking back, there are very few things I’d change, even if I had more money.

I am blessed to have a wonderful Daddy. The two of us are pretty close. I loved that he was so happy for me.

We did individual pics before the ceremony. Any of us together were taken after. I’m traditional in that way, and my favorite moment of any wedding is the look on the groom’s face when he first sees his bride. I still remember my Beloved’s vividly! One of my favorite moments in my life.

 “You may now kiss your bride!”

Exiting as husband and wife! We could barely contain our joy!

With our wedding party. I’m still friends with all of my bridesmaids. They are such a wonderful part of my life, and I am so thankful! 3 of the groomsmen are my brothers-in-law, and I’ve so enjoyed getting to know them better over the last decade. They’re all 10+ years older than my husband, so we were in for a lot of good-natured teasing. It’s how I knew they loved and accepted me into the family.

We had a lot of family and close friends who supported us, then and now.

The reception was fun, too. A friend of my husband’s made the cake. We obeyed tradition and kept the top tier in the freezer to eat a year later. It was still so good on our first anniversary that we ate the whole thing! (A slice each day for a week – not all in one sitting!)

When my parents were married, they had personalized toasting glasses. This lovely woman in Wichita, KS handpaints them with the bridal bouquet. I was thrilled to find out that she was still available. She did a beautiful job, and these are one of the things that I’ve packed most carefully when we have moved. Notice that we have sparkling cider. We weren’t yet 21 after all! And that halo effect going on behind our heads is just some weird decoration on the wall of the reception site.  I look like some kind of sharp, pointy angel in most of our cake pictures. We still laugh about it.

The rings, which my husband designed himself and had custom-made. Yeah, he’s that kind of guy. Didn’t I say that I’m blessed?

It was a GREAT day, and the beginning of a really beautiful thing. From this:


to this:

We’ve come a long way in 10 years, Beloved! I’m so happy to be your wife, and I’m so thankful for our children. I’m praying that we have many, many more lovely years together.


And a special Congratulations to my husband’s grandparents. This weekend, they celebrate their 70th wedding anniversary. The actual date was a couple of weeks ago, but the family is gathering this weekend. We can’t be there, which makes me so very sad! I missed their 60th celebration because I was in the final stages of planning our wedding. 70 years of marriage! Isn’t that incredible! Thanks, Grandma and Grandpa for being such a wonderful example for all of our family.

Previous Older Entries